Skip to main content area
Home
  • English
  • Español
  • Get it
  • Build it
  • Use it
  • Blog
  • DiyouPCB
    • Get It
    • Build
    • Use
    • Improve
    • Gallery
    • Downloads
  • Contact
  • About us

You are here

Home

The tutorial is ready!

Submitted by DIYouware on Mon, 06/22/2015 - 13:54

This morning we have finished writing last chapter of the tutorial so finally... it is ready!!

You will find the new chapters and the end of the Use it menu.

They describe step-by-step how to use TwinTeeth and its ToolHeads for doing the variety of tasks supported:

  • Plotting PCBs using a marker pen
  • Photoengraving PCBs using the Laser ToolHead
  • Drilling vias and holes
  • Dispensing Solder Paste
  • 3D printing

Any advice, ideas and sugestions about how to improve the tutorial will be greatly appreciated!!


  • Read more about The tutorial is ready!
  • Log in or register to post comments

Tutorial, new version of the software and research

Submitted by DIYouware on Tue, 06/09/2015 - 20:51

We continue with the ardous task of writing the tutorial...:-)

Yeah! It's almost finished. We only need to write some chapters about how to use the various Toolheads. Today we published another one: Plotting PCBs using a marker pen and we are working on the next one. This month we have to finish it. It seems like the NeverEnding story. :-)

We also published new versions of TwinTeeth firmware and TwinTeethMC. You can find and download them at the software installation page.

The new version includes support of HP-GL files, some minor changes and also some defect corrections. All of them are described in the release file you can find in the .zip file.

Additionally to writing the tutorial and improving the software we are also working on new functionalities.

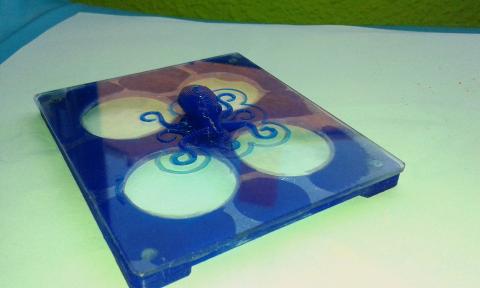
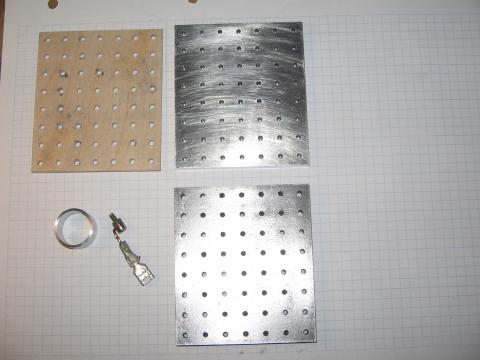
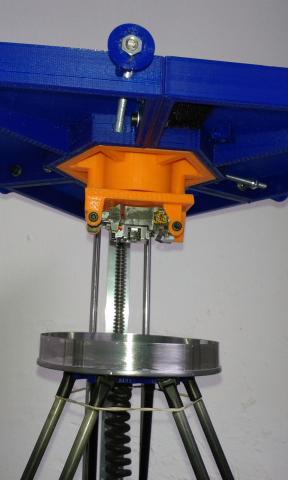
We are experimenting with some UV resin that a friend gently sent us for testing. We are trying to print in 3D on it using the laser pickup and we printed sucessfully some basic shapes although we are still looking the best way to do it. There are various designing possibilities. Now we are working on the resin vat and on how to attach it to the printer. For preliminary testing we used the tray you can see on the next picture. It is made of a tin of baby powder milk :-)

We are also testing Scankemi. It is a special film to make PCBs which does not require chemical developpers.

Bifelectronic guys gently sent us some sheets for testing purposes.

We don't really know how to use it to make PCBs yet because it doesn't adhere directly to the board. At the moment it's useful for testing.

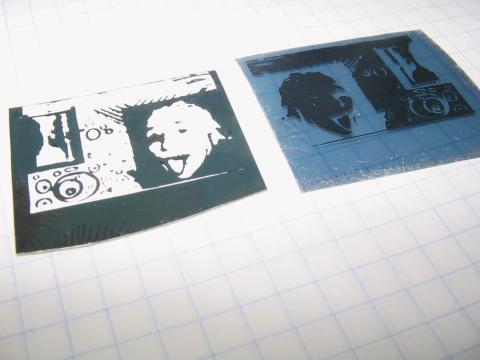
To use with TwinTeeth you just need to paste it with paper tape on the working platform and print on it with the Laser Toolhead.Once printed remove the top film to get the reflective pattern on the negative side and the positive one on the top side.

We think that it probably has to be used as a mask: first print the circuit on it using TwinTeeth and then use it to print the PCB "á la" traditional way using an UV isolator.

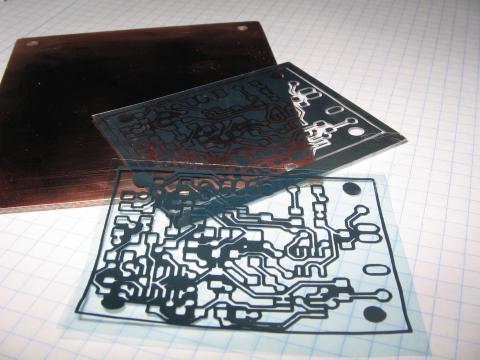
Another benefit of Scankemi is that we don't need to use Solar film because it is reflective by its own nature and it perfectly filters the "hallo" produced by the laser

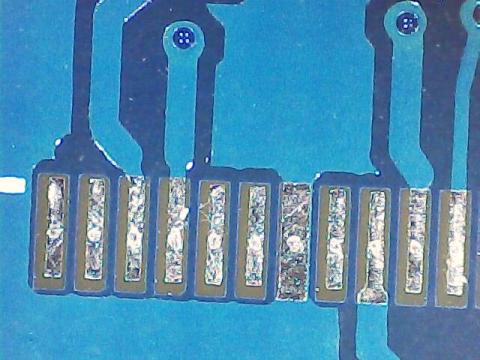
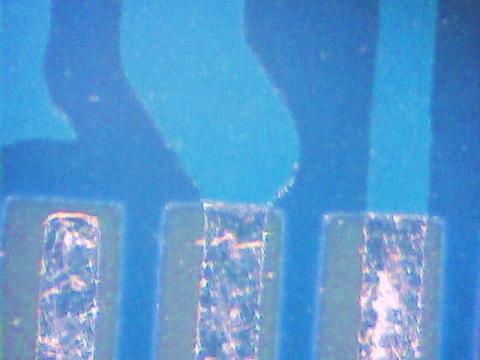
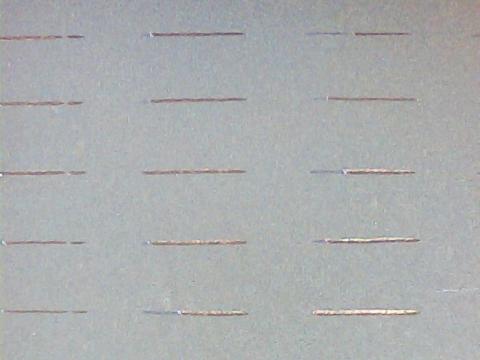
It has an incredible resolution. We easily printed some lines 0.5mm long and 20-40µ wide using the Laser ToolHead.

You can see them on the next picture at the 20x microscope.


On the other hand we are still managing the shop and selling kits around the world.

We never thought that we could sell them everywhere but globalization is here to stay. Thanks to some blogs and forums Twinteeth had worldwide diffusion and people from the five continents is asking us about it and the kits. Thanks very much to everyone who bought them because the money collected is helping us to continue researching ToolHeads and functionalities.

That's all for the moment.

We will continue working, researching and keeping you informed.

  • Read more about Tutorial, new version of the software and research
  • Log in or register to post comments

Mecaduino

Submitted by DIYouware on Mon, 04/27/2015 - 18:45

Last weekend we attended the Madrid Maker Faire as we told you.

It was amazing and we had so much fun. Many people attendeded the event and we did not stop a second showing TwinTeeth to the people. It had an excellent acceptance, mainly among electronic amateurs but also among children, families and students. We also had the chance to chat with some customers and friends, and even meet other makers and expositors. That is basically what these kind of events are: a socialization point in the isolated but interconnected world of internet :-) We would like to thanks Make magazine and specially to Cesar and Sara, the organizers.

We also collected there a lot of ideas and suggestions. We liked very much Mecaduino: a quickly building system which allows us to develop any kind of project at a very affordable price. It is a construction system based on 15x15mm aluminium profiles with a sophisticated shaping which allows interconnecting multitude of accessories. The versatility of the system is incredible and also how it solves linear axes of any kind, using belts or acme screws.

It is even elegant and beautiful! Here are some pictures:

I personally liked very much that the system is based on multiples of 15mm. The profiles are cut and milled always in that measure and all the parts and accessories meet that requirement. In this way it is very easy to create new things but also to assemble the pieces and reuse the parts in other projects.

We will try to use it in future projects because it solves a lot of our designing criteria and it let us time to focus on more important areas.

With Mecaduino and a 3D printer we can practically do anything we can imagine and easily integrate profiles and accessories with custom printed plastic parts.

So, well done Mecaduino!

  • Read more about Mecaduino
  • Log in or register to post comments

Madrid Maker Faire

Submitted by DIYouware on Thu, 04/23/2015 - 12:08

This week we have't got time to write chapters of the tutorial because we have been invited to show TwinTeeth at the Madrid Mini Maker Faire. It is organized by Make magazine and the fantastic guys of eoodescubre. So we are very excited and busy preparing all the stuff to show what TwinTeeth can do. If you want to attend the event you will be welcome.

We want to show the best of TwinTeeth at the fair, so we designed new accessories: a filament Spool Holder and a Glass Support, both for 3D printing ToolHead. We will share the .stl files as soon as possible.

Here is the glass support with a 3D octopus on it:

We have also found some bugs!

Yes, minor firmware defects which affected g-code parsing speed. They are already corrected and we will publish the new version probably next week.

More news:

We have finally reached an agreement with a metal artisan to make the aluminium platform kit for TwinTeeth. 

He already finished the testing phase and we will do the proof of testing at the faire.

The kit is composed by:

  • 1 PC aluminium 70x80x5mm platform
  • 1 PC Round stainless steel tube 20mm OD
  • 1 PC aluminium 70x80x10mm template
  • 8 PCs 2.5 x 8 mm precision pin
  • 8 PCs 2.5 x 6 mm precision pin

The platform is CNC drilled with 56 x 2.5mm ID precision holes. On the back side it’s milled to fit the 20mm OD tube. The template is just drilled with the 56 holes. It is used for drilling the four PCB holes and attach it to the platform with the pins.

This kit is only available upon request because we can not accept too many orders at a time. The artisan has other jobs and he can only produce some units per week.

If you are interested, please send us an e-mail.

  • Read more about Madrid Maker Faire
  • Log in or register to post comments

Microscope ToolHead

Submitted by DIYouware on Thu, 04/09/2015 - 13:06

We are very busy writing the tutorial and managing the shop but some days we have a minute to think about new TwinTeeth applications and write them in blogs entries like this. Today was one of these days.

This morning I was inspecting a PCB with a microscope and I thought: why not use it on TwinTeeth? It is one of those cheap, bad quality, USB microscopes you can find at ebay, but useful to see tiny objects.

So, I designed a new ToolHead hexagon and 3D printed it. Here it is: 

Then I installed the new ToolHead on TwinTeeth and connected the microscope to my computer.

I also took these pictures and wrote this blog entry.

I did all those things in one hour. This is the power of TwinTeeth extendibility and 3D printing!

How useful is it?

I think it is quite useful. Now I can focus the microscope with precision moving the Z axis. The original microscope framework was a toy without any precision. I can also move manually the focus point on the X/Y dimensions and maintain the focus because the bed auto-levelling works really fine. I could also write g-code programs for inspecting things automatically. Even recognize visual patterns using the appropiate software and detect PCB failures. Also take pictures on those locations or make microscopic movies.

Here are some examples:

So, we have a new ToolHead: the microscope ToolHead.

If someone wants the .STL file to 3D print it, don't hesitate to contact me.

  • Read more about Microscope ToolHead
  • 1 comment
  • Log in or register to post comments

Tutorial, BOM and Fixture Bed

Submitted by DIYouware on Tue, 03/10/2015 - 17:53

During last three weeks we have been working hard in the tutorial. We wrote some chapters and are still writing more. Now we are working on the software installation chapter and then we will begin with the calibration chapter. To write it, we disassembled the prototype and assembled again, and we seize the opportunity and we changed some old parts that were printed in different colours. Now it looks better. And it still works! :-) Every time we re-assemble it we find some tips to improve something. We published some of them in the tutorial.

On the other hand, our warehouse is now plenty of stock. We receive all the materials we needed and our 3D printing farm is also printing all the day.

We received some questions about the BOM of the Pickup Driver. We exported the BOM directly from Eagles CadSoft and in some devices it's not clear which package is needed. So we will clarify this in the following days.

We also received some emails asking why we do not sell the fixture bed and where it can be bought.

The fixture bed or platform is the piece of aluminium where we fix the PCB or material that we want to process. Really it is a complete fixing system composed of: a drilling stencil, the fixture platform and a small tube that attaches it to the Effector. It also has a screw to connect the spring cable. Optionally you can add a sacrifice plyboard for drilling and a glass to 3D print on it.

The fixture bed we have been using in the prototype was made by a friend using a manual milling machine. But to sell them at a reasonable price we need to find someone who manufactures it in series using a CNC milling machine.

Two weeks ago we contact a supplier and we are making some tests to check that the quality of the machining and the price is adequate. It is very important that it will be manufactured with precision: the holes of the platform and the stencil have to match perfectly and the dowel pins has to fit in the holes with minimal gaps.

Anyway, in case you want to make it by yourself or order it to a local milling company, we've updated the Autocad blue-prints to include detailed instructions about its construction.

You can download the new file at the Get it page.

If you have any other doubt about TwinTeeth assembling or the tutorial don't heasitate to contact us.


  • Read more about Tutorial, BOM and Fixture Bed
  • 2 comments
  • Log in or register to post comments

TwinTeeth building guide

Submitted by DIYouware on Thu, 03/05/2015 - 21:02

We have just published the first chapter of the building guide.

Please take a look at it, in the Build it section.

Our plan is to publish a new chapter almost every week.

It is a hard work because we are writing the tutorial in English and Spanish. We also have to take pictures of the assembling process step by step. We have disassembled the prototype because we don't have pieces to build a new one: last week we sold all our stock. And after that we have to assemble the prototype again. Fortunally it's easy to do it. We did it so many times that we could do it standing in our heads.

Anyway always is grateful to teach something from scratch.

At the same time we are re-sourcing our warehouse stock, supervising our 3D printer farm, preparing last-week customer orders, looking for new suppliers, answering emails, etc.

Please don't assemble TwinTeeth too fast: let us time to finish the tutorial. :-)


  • Read more about TwinTeeth building guide
  • Log in or register to post comments

TwinTeeth in the Media

Submitted by DIYouware on Mon, 03/02/2015 - 10:01


Sorry, we haven’t had a minute to write blog entries since we released TwinTeeth last Monday - And we have to thank to so many people for their help that we wanted to write it well. Today finally we have got time to do it.

The spreading of the project has been incredible. In two days it was referenced in blogs and other media around the world and immediately we started to receive emails of "makers" interested in our project. Also congratulation messages and ideas about how to modify it, improve it, use it for other things, etc. It has also been very touching to see so many people who like to make things by themselves around the globe. And we are very happy for being able to contribute to it with our designing, especially in third-world countries where they don't have many resources to buy expensive machines.

We feel that things are changing and we are living in a very special moment, a change of paradigm. Internet is spreading knowledge around the world and amplifying people’s skills. People feel that they can do things very easily by themselves with information obtained from other people. And they also see that they don't need big and expensive resources to build small machines like TwinTeeth or RepRap 3D printer, which help them to make other things and machines and create real objects out of abstract ideas.

We also receive information about interesting projects to use TwinTeeth in bio-medical applications. We’ve received some emails of researches interested in this area. It has also been a pleasure to help them to improve TwinTeeth to print tissue scaffolds and other bio materials. Unfortunately, we don't have too much time right now but sure in some months we can collaborate more with them.

Thanks very much to our customers for believing in us and in our project. We really appreciate them because they have been early-adopters, pioneers, people with courage who trust and believe in us and in our project. They will always have our special considerations. The funds we are obtaining with the shop will help us to fund other projects.

And special thanks to the media who has helped us to spread TwinTeeth. Sites like InsideTechKnow: a fantastic community about electrical engineering news and resources which gently featured our project. Many thanks also to 3ders.org which is doing an incredible work spreading 3D printing technology.  They write very interesting articles with added value not just copying form other sites.

Thanks also to the local blogs: www.imprimalia.com, www.spainlabs.com and www.bricogeek.com who was one of the first to reference us. And of course to www.hackaday.com: a reference point for hackers and makers around the globe.  www.electronics-lab.com  is also a fantastic site about circuits and electronic devices; Also to 3dprint.com and so many other blogs who have believed in us.

And thanks also to blogs in other languages: Dutch, Italian, Chinese, Japanese, Arab, Hungarian, German, etc. whose content unfortunately we don't understand but they also help us to spread the project:

http://www.3ddayin.net/news/TwinTeeth.html

http://www.stamparein3d.it/la-diyouware-twinteeth-pcb-maker-molto-piu-che-una-stampante-3b-per-circuiti-una-vera-e-propria-fabbrica-in-miniatura/

http://www.mopintu.com/article-2722-1.html

https://fabcross.jp/news/2015/02/20150227_twinteeth.html


Thanks to all of them!!

Diyouware team.

  • Read more about TwinTeeth in the Media
  • Log in or register to post comments

Thank you very much

Submitted by DIYouware on Fri, 02/27/2015 - 15:50

Thank you very much for your support and enthusiasm!

We have received a great deal of emails with congratulations, questions and orders. It is really touching to see how many people are following our project.

We have received more orders than we expected and we are running out of stock. We will need some time to complete our stock again.

Meanwhile please submit your order and we will put your order on a waiting list. We will deal with them in order of reception.

We will not ask for a Paypal payment until your order will be ready to processing.

When you submit your order we will send you a notification and indicate your position on the waiting list. Of course you can cancel or modify your order at any time you wish.

Once we will have stock to deliver the order we will send you an email and attach your PayPal invoice.

We will use this wasted time to start redacting the tutorial. Many of you have bought already the kits and will need the tutorial to build TwinTeeth. 

We will keep you informed.


Thank you again for your support and for any inconvenience.

Diyouware team

  • Read more about Thank you very much
  • Log in or register to post comments

Finally, here it is!

Submitted by DIYouware on Sun, 02/22/2015 - 20:51

After one year working very hard, finally here it is!

We just published TwinTeeth!

Thanks for your support and for be patient.

Diyouware team


  • Read more about Finally, here it is!
  • Log in or register to post comments

Pages

  • « first
  • ‹ previous
  • 1
  • 2
  • 3
  • 4
  • 5
  • next ›
  • last »

(c) 2013 Diyouware.com